Introduction to Roblox Studio
Roblox Studio is a powerful and versatile development platform that allows users to create their own games, interactive experiences, and virtual worlds within the Roblox universe. It provides a comprehensive set of tools and features that empower users to unleash their creativity and bring their ideas to life.
What is Roblox Studio?
Roblox Studio is the official game development environment developed by Roblox Corporation. It serves as the primary tool for building and scripting games on the Roblox platform. With Roblox Studio, users can design and create immersive 3D environments, build interactive gameplay mechanics, and even write custom scripts to control the behavior of in-game elements.
Roblox Studio offers a user-friendly interface that caters to both beginners and experienced developers. It provides a wide range of pre-built assets, models, and scripts that users can utilize to kickstart their creations. Additionally, it supports collaborative development, allowing multiple users to work together on the same project simultaneously.
Purpose and Features of Roblox Studio
The primary purpose of Roblox Studio is to enable users to unleash their imagination and create their own virtual experiences. Whether you’re interested in designing a thrilling action game, a social hangout, or an educational simulation, Roblox Studio provides the tools and flexibility to bring your vision to life.
Some key features of Roblox Studio include:
-
3D Environment Building: Roblox Studio allows users to create and manipulate 3D environments using a variety of tools and building blocks. Users can design landscapes, buildings, and other structures to create unique game worlds.
-
Object Placement and Customization: In addition to building environments, users can add interactive objects, characters, and items to their games. Roblox Studio provides a vast library of assets that can be customized to suit specific needs.
-
Scripting and Coding: For users with programming knowledge, Roblox Studio offers a powerful scripting language called Lua. With Lua scripting, users can create complex gameplay mechanics, design interactive NPCs (non-player characters), and add dynamic events to their games.
-
Testing and Debugging: Roblox Studio provides a built-in testing environment that allows developers to preview and playtest their games directly within the editor. This helps users identify and fix any issues or bugs before publishing their creations.
-
Publishing and Sharing: Once a game or experience is complete, users can publish it to the Roblox platform, making it accessible to millions of players worldwide. Roblox Studio also allows users to collaborate with others, inviting friends or team members to contribute to the development process.
Roblox Studio is a versatile and accessible platform that empowers users to turn their ideas into interactive realities. Whether you’re a seasoned developer or just starting your game development journey, Roblox Studio provides the tools and resources to create and share your own unique experiences within the Roblox community.
Getting Started with Roblox Studio
If you’re ready to unleash your creativity and build your own Roblox experiences, Roblox Studio is the place to start. This section will guide you through the initial steps of getting started with Roblox Studio, including creating an account, navigating the interface, and understanding the basic tools and functions.
Creating an Account
To begin your journey with Roblox Studio, you’ll first need to create a Roblox account. Visit the Roblox website and click on the “Sign Up” button. Fill in the required information, such as your username, password, and date of birth. Make sure to choose a unique username that represents you as a developer or player in the Roblox community.
After creating your account, you can personalize your Roblox avatar to reflect your style and preferences. This allows you to showcase your individuality as you embark on your creative journey with Roblox Studio.
Navigating the Interface
Once you have your Roblox account, you can access Roblox Studio by downloading the Roblox software onto your computer. The software is available for both Windows and Mac operating systems. Visit the Roblox download page to get started.
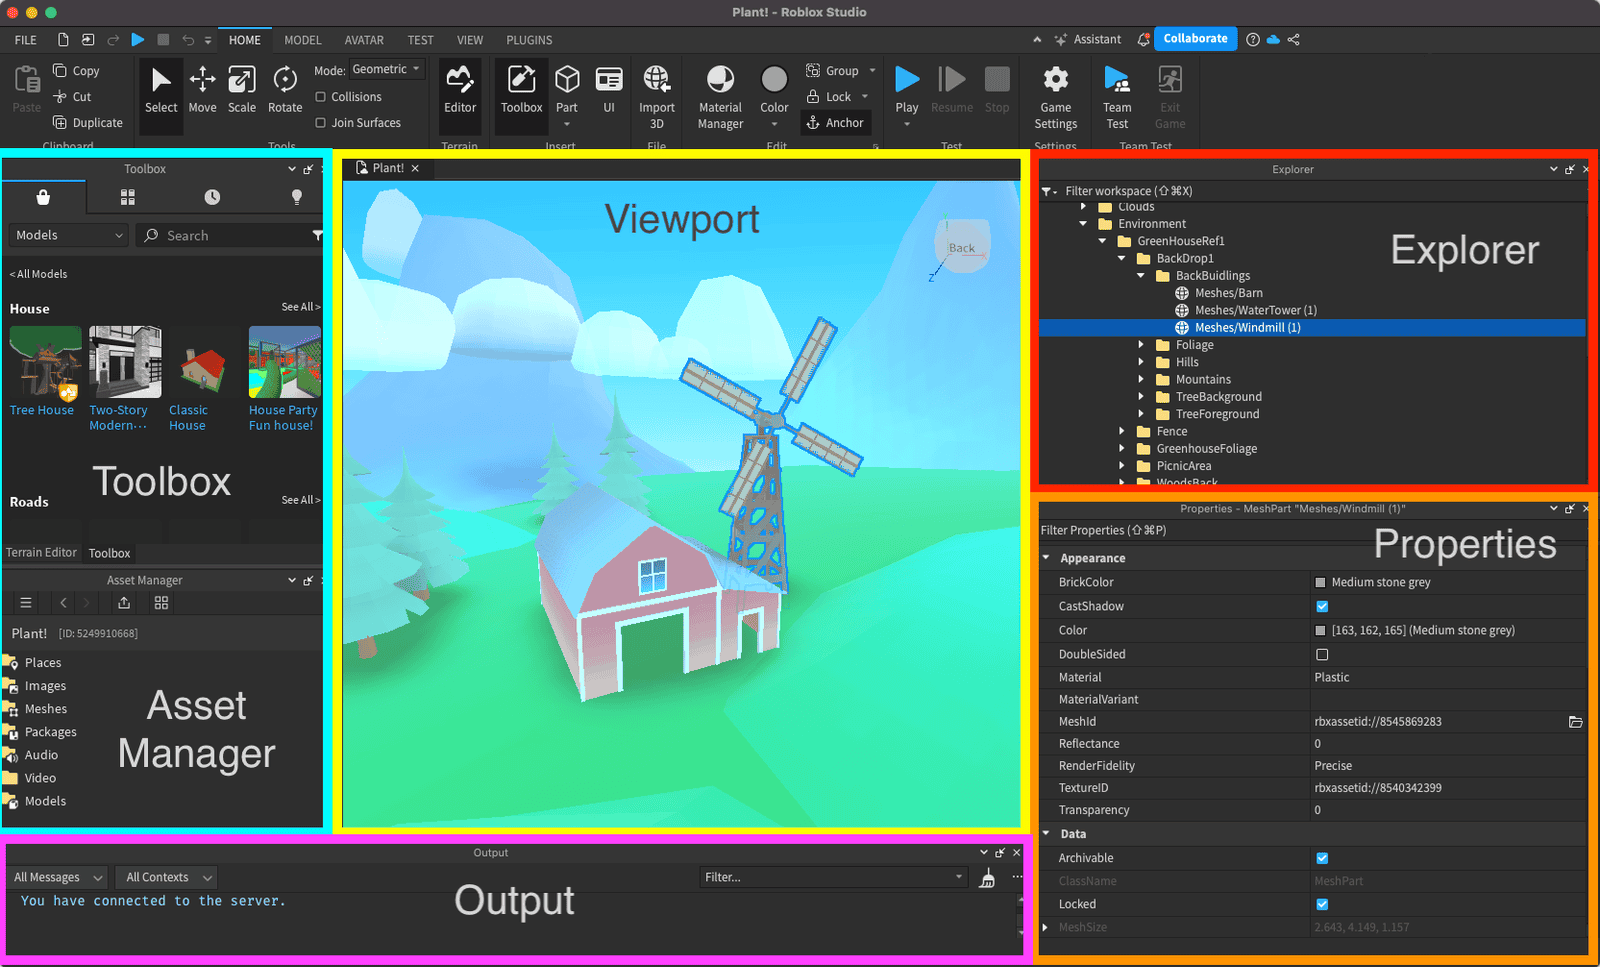
After launching Roblox Studio, you’ll be greeted with a user-friendly interface that provides you with all the necessary tools and features to create your own Roblox games and experiences. Familiarizing yourself with the different elements of the interface is essential to navigate through the various menus and options efficiently.
Basic Tools and Functions
Roblox Studio offers a wide range of tools and functions that empower you to bring your imagination to life. Here are some of the basic tools and functions you’ll encounter:
-
Explorer: The Explorer window allows you to view and organize the objects, scripts, and other components of your game. It provides a hierarchical representation of your game’s structure, making it easier to manage and modify different elements.
-
Properties: The Properties window enables you to modify the properties of selected objects. You can tweak characteristics such as size, color, and behavior to customize your game environment.
-
Toolbox: The Toolbox provides a vast collection of pre-built models, scripts, and assets that you can use to enhance your game. It offers a convenient way to access ready-made resources and incorporate them into your creations.
-
Scripting: Roblox Studio incorporates a powerful scripting language called Lua. With Lua scripting, you can add interactivity and functionality to your game. By writing code in the Script Editor, you can bring your game to life and create unique gameplay experiences.
Now that you’re familiar with the basic tools and functions of Roblox Studio, you’re ready to dive deeper into building your own Roblox world. The next section will guide you through designing your game environment, adding objects and elements, and the art of scripting and coding in Roblox Studio.
Building Your Roblox World
Once you’ve familiarized yourself with the basics of Roblox Studio and its interface, it’s time to start building your very own Roblox world. This section will guide you through the process of designing your game environment, adding objects and elements, and even delving into the world of scripting and coding in Roblox Studio.
Designing Your Game Environment
The first step in creating your Roblox game is designing the game environment. This includes determining the setting, atmosphere, and overall look and feel of your game world. Consider the theme or genre of your game and use that as a starting point for your design. You can create anything from a sprawling cityscape to a lush fantasy realm or even a futuristic space station.
Roblox Studio provides a wide range of tools and features to help you bring your vision to life. Utilize the terrain editor to sculpt the landscape, add textures and colors to surfaces, and create unique terrain features like hills, mountains, and bodies of water. Additionally, you can use the built-in lighting system to set the mood and ambiance of your game world.
Adding Objects and Elements
Once you have the basic layout of your game environment, it’s time to populate it with objects and elements. Roblox Studio offers a vast library of pre-made assets that you can use to enhance your game. From trees and buildings to vehicles and characters, you can find a variety of objects to suit your game’s theme.
To add objects to your game, simply browse the Roblox library or import your own custom assets. Place objects in the world by dragging and dropping them into the desired location. You can then resize, rotate, and position objects to achieve the desired effect. Experiment with different combinations of objects to create an immersive and engaging game world.
Scripting and Coding in Roblox Studio
To take your game to the next level, you can delve into the world of scripting and coding in Roblox Studio. With the powerful Lua programming language, you can create interactive gameplay elements, develop complex game mechanics, and add functionality to your game.
Roblox Studio provides an integrated code editor where you can write and test your scripts. You can attach scripts to objects or create scripts that control the behavior of the entire game. With the help of scripting, you can create interactive NPCs, enable player interactions, implement game rules, and much more.
To deepen your understanding of scripting in Roblox Studio, you can explore the extensive documentation and tutorials available on the Roblox Developer Hub. Additionally, the Roblox community is a valuable resource where you can seek help, share your creations, and collaborate with other developers.
By designing your game environment, adding objects and elements, and utilizing the power of scripting and coding, you can create unique and immersive experiences in Roblox Studio. Let your imagination run wild and bring your game ideas to life.
Sharing Your Creations
Once you’ve created your masterpiece using Roblox Studio, it’s time to share your creations with the world. Roblox Studio provides various ways to publish, collaborate, and engage with others in the Roblox community.
Publishing Your Game
Publishing your game on Roblox allows other players to experience and enjoy what you’ve created. To publish your game, follow these simple steps:
- Ensure your game is complete and thoroughly tested.
- Click on the “Home” tab in Roblox Studio.
- Select the game you want to publish from your list of projects.
- Click on the “Publish to Roblox” button.
- Fill in the necessary information, such as game title, description, and genre.
- Choose the appropriate age group for your game.
- Set the game’s access permissions (public, private, or group).
- Add relevant tags to help players find your game.
- Customize your game’s thumbnail image.
- Click on the “Publish” button to make your game available to the Roblox community.
Once published, players can find and play your game through the Roblox website or app. Keep in mind that you can update and improve your game even after it’s published to provide the best experience for your players.
Collaborating with Others
Roblox Studio also offers features for collaborating with other developers and creators. Collaboration can enhance the quality and creativity of your game. To collaborate with others:
- Invite other developers to your project by adding them as team members.
- Assign roles and permissions to team members based on their responsibilities.
- Use the built-in collaboration tools in Roblox Studio to work together on different aspects of the game simultaneously.
- Communicate effectively with your team through chat, comments, and notes within Roblox Studio.
Collaborating with others can bring fresh ideas, diverse skills, and shared knowledge to your game development process, resulting in a more engaging and polished final product.
Engaging with the Roblox Community
Engaging with the Roblox community is an excellent way to gain exposure, receive feedback, and connect with like-minded individuals. Here are some ways to engage with the Roblox community:
- Participate in the Roblox forums and discussions to share your experiences, ask questions, and learn from other developers.
- Join Roblox groups and communities related to game development to connect with fellow creators and exchange ideas.
- Attend Roblox events, such as game showcases and competitions, to showcase your game and interact with the community.
- Create a social media presence for your game and engage with players through platforms like Twitter, Instagram, and YouTube.
- Explore and play other games created by the Roblox community. It can inspire you and provide insights into different game design techniques.
By actively engaging with the Roblox community, you can build a network of support, gain valuable feedback, and discover new opportunities for collaboration and growth.
Sharing your creations through publishing, collaborating with others, and engaging with the Roblox community is an exciting part of the Roblox Studio experience. Embrace the opportunity to showcase your talent, connect with fellow creators, and make a lasting impact in the vibrant world of Roblox.